NOTE: This documentation is for version 2.1 and up. If you are using an earlier version, you’ll need to look to the Read Me file included with the download.
Overview
PathSnagger is an application which allows you to copy the path of any selected item (or items) in the Finder, apply various customizable transformations to that text, and place the result in the clipboard. People around the world use PathSnagger to: send clickable URLs of shared documents to their colleagues; easily describe the path of a file located deep in the file system; quickly determine a folder location for pasting into Terminal; transform a path from a network share to Windows format, etc. PathSnagger is invoked through the use of Services, either via a right-click on the item, or by selecting the item and choosing PathSnagger from the Finder’s Services menu.
Installation
Copy PathSnagger.app to your Applications folder. That’s it!
Usage
PathSnagger does not need to be running to invoke it. If you select “Snag Path” from the Finder contextual menu, PathSnagger will launch if it needs to. You can either launch it in this way, or you can explicitly double-click it from your Applications folder.
By default, PathSnagger will copy the path to your clipboard, and then quit. If you want to edit the preferences, you will need to launch it by double-clicking it so it will stay open.
If you don’t change anything, PathSnagger will copy the path to the clipboard of the selected Finder item(s) in “POSIX” form. This means PathSnagger itself would be represented by:
/Applications/PathSnagger.app
If you have multiple items selected, they will have semicolons between the items, like this:
/Applications/Mail.app; /Applications/PathSnagger.app
You can change all of this in the preferences, but if you’re happy with the defaults, you can just go ahead and use the app.
Preferences
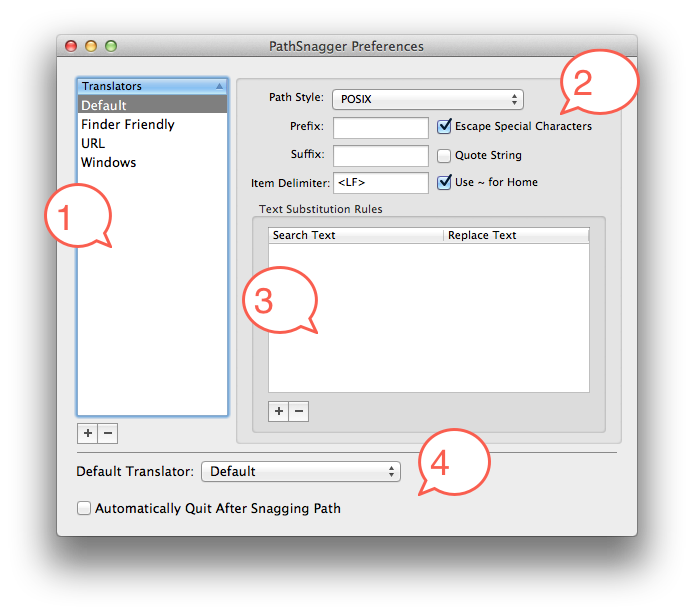
PathSnagger’s preferences are divided into four main regions, as shown in the screenshot below. When you snag a path, PathSnagger will allow you to specify a Translator to act upon the file(s) that were selected. A Translator can specify a base path style, a number of simple actions to take (adding quote marks, a prefix or suffix, etc.) and a series of text substitutions to perform on the paths.
- The Translator list.
- Translator-specific preferences for the selected translator.
- Text substitution rules for the selected translator.
- Global preferences.
The Translator List
This is your list of Translators. You do not have to have any Translators at all, if you are happy with PathSnagger’s default manner of snagging the path. If you want to have more control, you can add as many Translators as you wish. You can also specify a Translator to act as the default. More on that below, under Global Preferences.
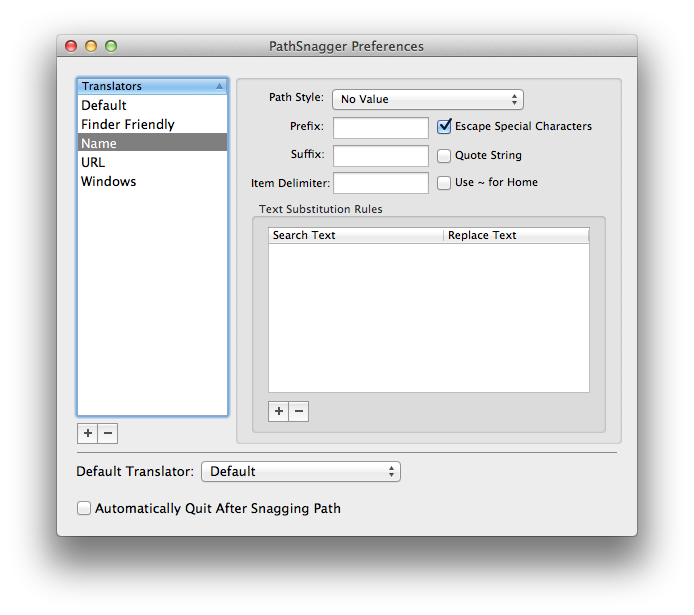
To add a Translator, click the + button below the Translator list (#1 in the screenshot.) When you do this, PathSnagger will insert a new Translator in the Translator list, with a default name of “Name”.
At this point, you can go ahead and rename it by double-clicking its name. You can modify the translator-specific settings as described below in “Translator-specific Preferences.”
You can always modify an existing Translator by selecting it in the Translator list. To delete a Translator, click the – button at the bottom of the Translator list. Changes are automatically saved.
Translator-specific Preferences
Path Style
This is the base style that PathSnagger will use for the path. You may choose from POSIX, HFS, File, and Windows. When describing the styles, all examples are using the Address Book application as an example. It is located in the Applications folder of the startup disk.
- POSIX – This is the way paths are generally displayed in Unix, and OS X. Example:
/Applications/Address Book.app - HFS – This is the way paths were displayed in MacOS, prior to OS X. AppleScript sometimes still uses this format. Example:
Macintosh HD:Applications:Address Book.app - File – This is the way web browsers display file paths. Example:
file://localhost/Applications/Address%20Book.app - Windows – This is the way Windows displays file paths. Example:
\Applications\Address Book.app
Prefix
This is a string that will be placed before the path. NOTE: If multiple files are selected, this prefix will only appear once: at the front of the list.
Example:
File list:/Applications/Address Book.app; /Applications/App Store.app
Suffix
This is a string that will be placed at the end of the path. NOTE: If multiple files are selected, this suffix will only appear once: at the end of the list.
Example: File list:/Applications/Address Book.app; /Applications/App Store.app*End of list*
Item Delimiter
This is a string that will be placed in between items in a list. This is really only useful if you are selecting multiple items in the Finder. You may use the placeholder
Example: /Applications/Address Book.app; /Applications/App Store.app
Escape Special Characters
If selected, this will place a backslash character (\) before certain characters. This is primarily useful if you are copying and pasting into a Terminal window. Spaces, for example, are not legal on the command line, but a backslash-space combination is.
Example: /Applications/Address\ Book.app
Quote String
This will place double quote characters around the path. NOTE: If multiple files are selected, the quotes will appear around each item, not the entire string.
Example: "/Applications/Address\ Book.app"
Use ~ for Home
This will use ~ to indicate the current logged in user’s home directory.
Example: ~/Documents
Text Substitution Rules
This is your list of available text substitution rules. These are specific to the selected Translator. These are very simple search-and-replace rules. The engine will find any available instance of “Search Text” and replace it with “Replace Text”. The rules will execute in the order displayed on screen.
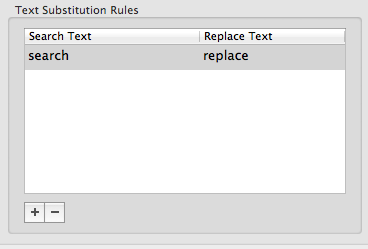
To add a rule, click the + button below the Text Substitution Rules list (#3 in the screenshot.) When you do this, PathSnagger will insert a new rule in the Rules list, with a default “Search Text” of “search” and a default “Replace Text” of “replace”.
You can always modify an existing rule by double-clicking the cell you want to edit in the Rules list. To delete a rule, click the – button at the bottom of the Rules list. Changes are automatically saved.
Global Preferences
Default Translator
If you have multiple Translators, you can specify that PathSnagger should always use one of them, unless specifically told otherwise. This is handy if you frequently copy POSIX paths, but every once in awhile need to copy a Windows path, for example.
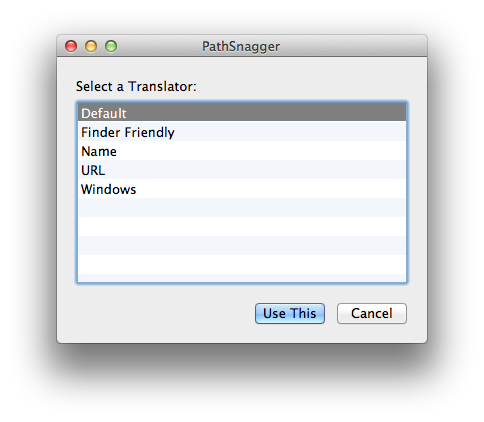
If you have a Default Translator specified, you can ask PathSnagger to use a different Translator by holding down the option key when you select “Snag Path” from the contextual menu in the Finder. If you do this, the following dialog box will appear:
Select the Translator you want to use, and click “Use This”.
Automatically Quit After Snagging Path
This is pretty straightforward. Invoking the service will launch the application, so the task can be performed. If you don’t want PathSnagger hanging out in your Dock after the path has been snagged, you can enable this option. When this is set, whenever you invoke the service, PathSnagger will automatically quit after the path is placed in the clipboard. You can always launch PathSnagger from the Applications folder directly if you want to reverse this option, or you need to look at the Preferences for some other reason.
Growl Support
If you have Growl enabled, PathSnagger will notify you when the path has been snagged. An option will be added to the preferences to enable/disable this feature. Currently it is always on if you have Growl installed.


